To use Webcam Motion Capture for live streaming on platforms like YouTube or to save it as a video file, OBS Studio is commonly used. OBS Studio is free, established software for video recording and live streaming.
The following only describes how to set up Webcam Motion Capture in OBS Studio. For instructions on how to use OBS Studio, please refer to external sources.
There are 2 options: Use Spout2 (Only for subscribing users) or Game Capture
There are 2 options: Use Syphon Client (Only for subscribing users) or MacOS Screen Capture

You can swtich Facial Expressions using the Keyboard.
By default, Auto Expression is active. You can activate each assigned Emotion (Neutral, Fun, Angry, etc.) using the F1, F2, F3, ... keys (Figure 1 (B)), and switch back to Auto Expression by a key (Figure 1 (A)) on your keyboard.
When Auto Expression is active, all the Facial Expressions are controlled by the Webcam. Otherwise, the Webcam controls only the Mouth Shapes and Blinks.
![]()
![]()
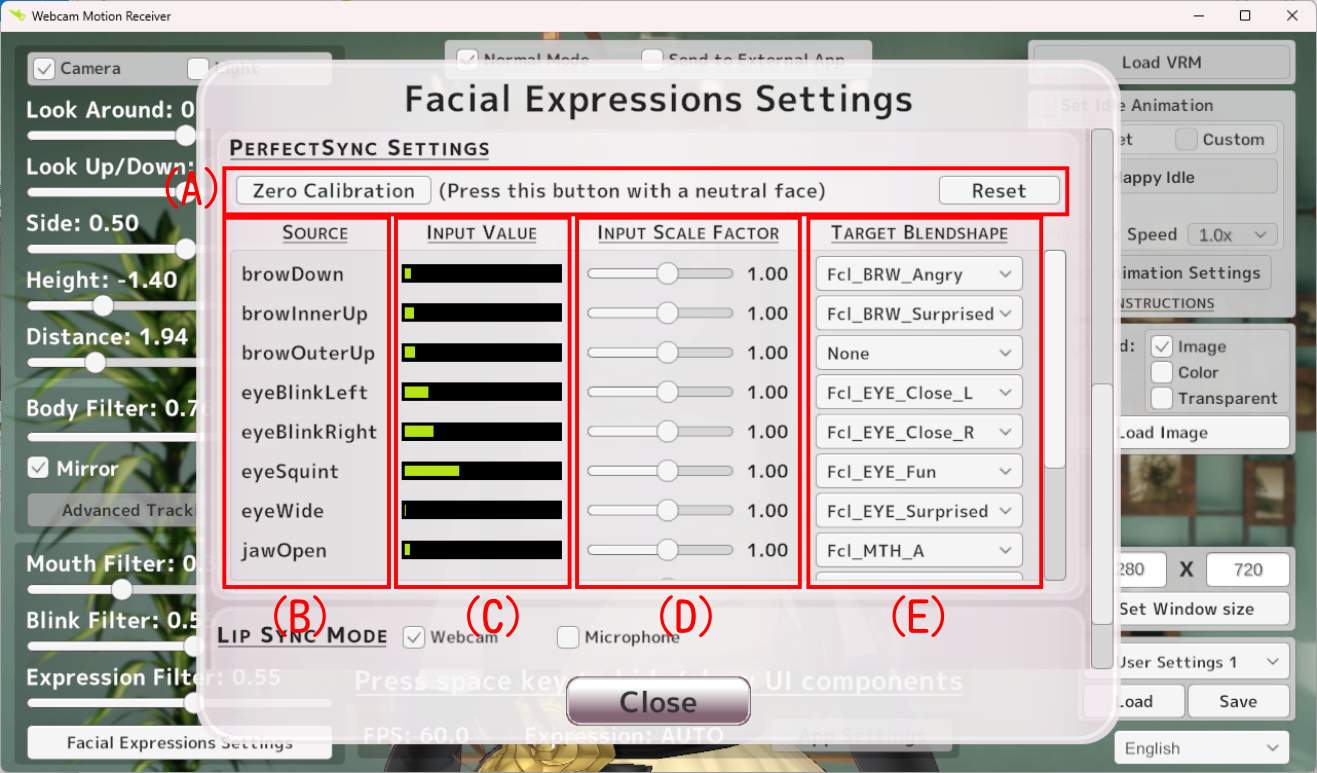
PerfectSync trackes the movement of each facial feature (eyebrows, eyes, mouth shapes, etc.) individually. The tracked features correspond to the BlendShapeLocation defined in ARKit (Apple's AR platform for iOS).
The loaded animation is applied to all the bones except the following bones by default. You can override this behavior globally*1 or separately for each sub-animation*2.
In addition to the main animation, you can set up to 20 sub-animations, which can be switched using the assigned keys.
* If it does not connect, the network traffic may be blocked by a firewall on your PC.
Open "Windows Defender Firewall with Advanced Security" by pressing Win + R, typing wf.msc, and pressing Enter. Select Inbound Rules and find webcam motion receiver.exe. By double clicking it, open webcam motion receiver.exe Properties. Choose Allow the connection in the Action section (Refer to this image).
If you don't see webcam motion receiver.exe in the list, please add it manually by clicking New Rule... on the right side of the window, select Program in Rule Type, and follow the prompts. (The program path is C:\Program Files\Webcam Motion Capture\bin\Mocap\Webcam Motion Receiver.exe by default.)
When using a 3D background, here is how the app handles cameras and lighting.
*We recommend using the Scene or Custom cameras below instead of the Main Camera in 3D Background mode.
You can load .glb / .gltf format files as your custom 3D background. You can use any 3D software to create it, as long as your final scene can be exported as a .glb or .gltf file. We provide two methods (Unity / Blender) to create a 3D background below. Both methods are completely free!
This method uses our Sample Unity 3D Background, which comes with a pre-configured room template, allowing you to build your room using drag-and-drop. No prior 3D experience is required.
*Advanced Unity Users: You do not need to use the sample file to create a 3D background. You can create a custom 3D background entirely from scratch by using the Built-in Render Pipeline and installing the glTFast package.
If you are familiar with 3D modeling software, you can build your 3D background entirely from scratch or use our Sample Blender 3D Background as a base.
While you can export lights from Blender, their appearance in Blender will not perfectly translate to the Webcam Motion Capture. To accurately see how it will look, we recommend doing your modeling and texturing in Blender, and your final lighting adjustments in Unity.


